

The acrylic painting of an owl is among the highest quality options for painters. While there is a vast array of color options, you’ve made the right choice in going with acrylic owl painting ideas.
It’s finally time to settle down and create a masterpiece, but just as you’ve picked out the perfect canvas, paints, and brushes, you’ve realized that you’re missing a crucial component: inspiration.
Trying to decide about owl paintings on canvas may be difficult. Since even the most creative artists sometimes experience a creative block, this is quite normal.
Table Of Contents
Methods of Painting Of An Owl: 101 Ways
Learning how to paint with an acrylic painting of an owl takes time just like learning any other craft. Thanks to the help of artists who have been teaching easy owl paintings professionally for years.
Acrylic paints provide the artist with almost infinite freedom. If you have acrylic paints at home and don’t know how to start, you’re at the right place.
Here is how to paint an owl step by step:
1- Draw an Owl Sketch
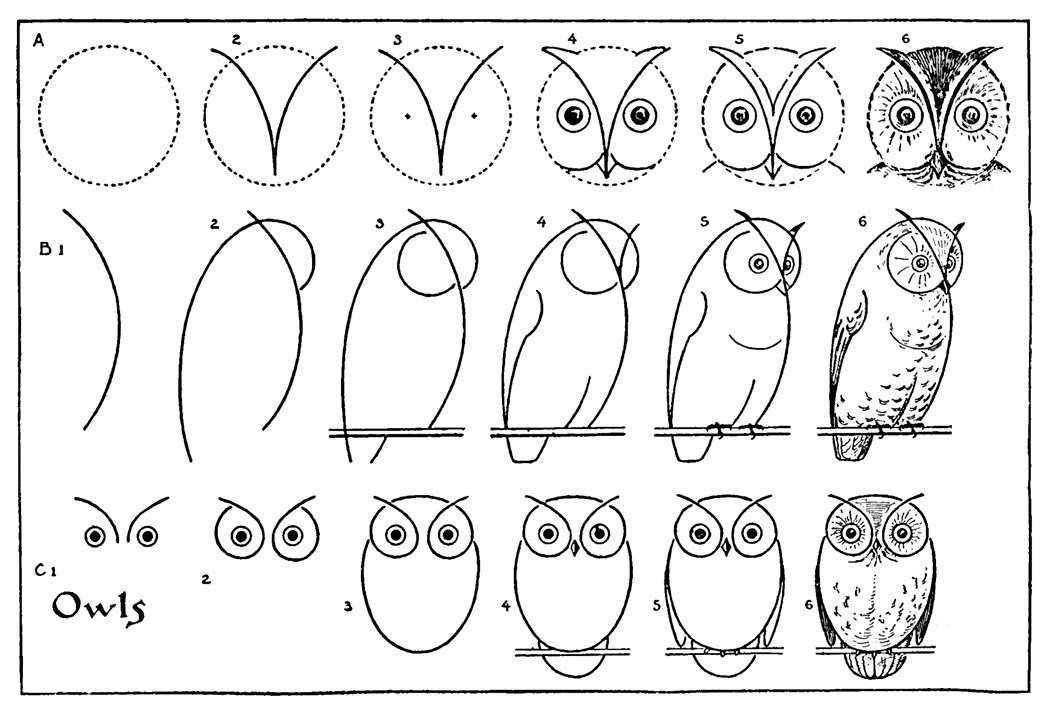
When painting an owl, the first thing you should do is sketch it out. Your drawing will help you choose shapes to pour.
No need to freak out if you’re not naturally gifted at art; YOU CAN DO THIS! Use a ruler or transparent sewing ruler to create guidelines. Mark the canvas center with perpendicular lines. Work outward from the center.
Make guidelines for any point. I used them to ensure that the eyes were at the same height, but you may use them for anything you’re uncertain about. Measure everything—you won’t see it. You’ll appreciate it afterward.
Print anything and trace it if you hate sketching.
2- Paint Your Owl’s Stomach
The chest is the next phase in your cute owl painting. I made this area in two layers to make it seem fluffy and feathery.
- Outline the upside-down U-shaped inside chest with white.
- Color the gap between your wings and outline.
- To fill in the white outline, use a tiny palette knife to scrape through the colors in the crack heading toward the wing.
- Make light, quick, curving strokes.
- Fill the owl’s stomach.
3- Paint Owl Tufts

I painted some amazing tufts to give emphasis to the owl’s eyes, which are its most important feature.
- Paint your tufts with a light coat of white paint.
- To create the tufts, use tiny lines of your chosen colors. The colors I chose were magenta, metallic cobalt, and pale blue.
- String the beads along the owl’s face in the middle, following the shapes of colorful paint.
4- Paint Owl’s Head
It’s time to put the finishing touches on the painting of an owl. I started with the forehead and moved on to the eye region.
- Paint the forehead in a V shape between the brows. I used colors like copper, bronze, gold, and white to make the wings and chest seem even.
- From the center of the head to the brows, pour white paint. Avoid oversleeping this line toward the brows. You may re-pull the tufts and brows, and everything will be OK.
- Afterward, pour lines of paint beneath each eye, following the arc of the eyeballs as a guide. I used metallic cobalt, light blue, copper, and umber.
- Pour two little puddles in the middle of each curve. Use a wider palette knife to spread this white paint over the colors. Don’t worry about leaving an empty socket; you can fill it in afterward.
5- Finish Your Owl Painting When It Dries
Now that your acrylic painting of an owl is dry, you may add the details!
Pro Tip#1: Using the paint directly from the tube will provide you with better coverage and allow you to paint over colors other than white. To create fascinating effects, use diluted paint for pouring.
Pro Tip#2: If you make a mistake and recognize it fast enough, you can typically remove it with a moist paper towel or baby wipe. To avoid removing any more layers than necessary, please clean carefully.
Start Your Painting Now
Artists who aren’t afraid to try new things will love acrylic. Practicing and experimenting are essential to improve one’s skills in the acrylic painting of an owl. Even if you have never painted before, you’ll be able to use this information to get started with acrylics.

